Jump to the English version here.
Το πρόβλημά μου ήταν ότι ο ανεμιστήρας του ψυγείου του DUCATI 748 δεν άνοιγε.
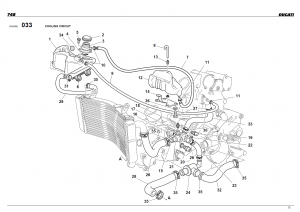
Αυτό είχε ως αποτέλεσμα να ραγίσει το πάνω δοχείο του ψυγείου (εικόνα 1 αντικείμενο 1 με κωδικό 585.1.011.1A και κόστος 36€).
Εδώ πρέπει να πω ότι επειδή δεν άνοιξα τα μάτια μου καλά, αγόρασα πρώτα το κάτω δοχείο (εικόνα 1 αντικείμενο 12 με κωδικό 585.1.012.2A και κόστος 72€) το οποίο και έχω ακόμα – αχρείαστο να είναι. Όποιος δεν έχει μυαλό…
Εικόνα 1 Figure.
Για να βρω τί φταίει στο σύστημα ξεκίνησα από τον ανεμιστήρα. Του έδωσα 12V. και είδα ότι λειτουργεί. Το κύκλωμα είναι απλό.
Έβγαλα την φύσα από τον θερμοστατικό διακόπτη και βραχυκύκλωσα τους δύο ακροδέκτες. Και πάλι ο ανεμιστήρας άναψε. Σε αυτό το σημείο μπορούμε να συνδέσουμε έναν διακόπτη στην φύσα και να κάνουμε τον ανεμιστήρα να ανοίγει χειροκίνητα.
Το επόμενο βήμα ήταν να ελεγχθεί ο θερμοστατικός διακόπτης (εικόνα 1 αντικείμενο 20 κωδικός 552.4.008.1A). Για να βγει όμως ο διακόπτης πρέπει να αδειάσουμε τα υγρά του ψυγείου. Αυτό γίνεται εύκολα αν ξεβιδώσουμε την τάπα-βίδα που υπάρχει δίπλα τον διακόπτη γι′ αυτόν ακριβώς τον σκοπό (εικόνα 1 αντικείμενο 22). Καλό θα είναι να ανοίξουμε την πάνω τάπα πλήρωσης του δοχείου νερού ώστε να αδειάσει πιο εύκολα το σύστημα ψύξης (εικόνα 1 αντικείμενο 2).
Σε ένα μπρίκι με νερό στερεώνουμε τον διακόπτη με σύρμα ώστε να βρίσκεται μέσα στο νερό η κάτω μεταλλική του επιφάνεια. Συνδέουμε ένα πολύμετρο στους δύο ακροδέκτες του διακόπτη και ξεκινάμε το ζέσταμα. Το πολύμετρο πρέπει να ρυθμιστεί στον να δείχνει πότε ένα κύκλωμα ειναι κλειστό (ηχητικό σήμα). Καλό είναι να παρακολουθούμε την θερμοκρασία του νερού με ένα μαγειρικό θερμόμετρο. Προσοχή το θερμόμετρο να μην ακουμπάει στο στην βάση από το μπρίκι γιατί εκεί η θερμοκρασία είναι διαφορετική!!!
Από το παραπάνω πείραμα κατέληξα ότι ο διακόπτης είχε πρόβλημα. Πάμε για αλλαγή. Τηλέφωνο στην DUCATI και κόστος γύρω στα 60€!!! Αναζήτηση στο ebay, όλοι μεταχειρισμένοι γύρω στα 30€ (χωρίς μεταφορικά).
Ευτυχώς όμως που υπάρχουν και οι φίλοι που γνωρίζουν καλύτερα από μένα και επίσης θέλουν να βοηθήσουν με οποιοδήποτε τρόπο.
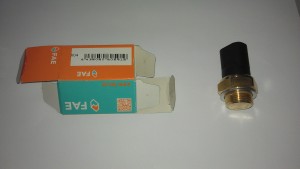
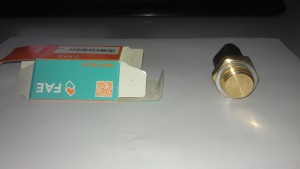
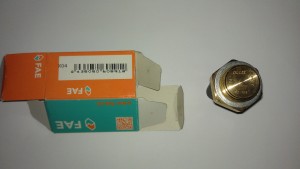
Έτσι ο φίλος Κώστας μου βρήκε τον παρακάτω θερμοστατικό διακόπτη ολοκαίνουριο (εικόνες 2-5) στην τιμή των 3€ με απόδειξη. Το γράφω και ολογράφως για να μην υπάρχει θέμα. Στην τιμή των τριών Ευρώ με ΦΠΑ!!! Στις παρακάτω εικόνες θα δείτε όλα τα στοιχεία του διακόπτη ώστε να μπορέσετε να τον ψάξετε και μόνοι σας.

Εικόνα 2 Figure.
Εικόνα 3 Figure.
Εικόνα 4 Figure.
Εικόνα 5 Figure.
Πάμε τώρα για την τοποθέτηση και τον έλεγχο του κυκλώματος με το νέο εξάρτημα.
Πριν συμπληρώσουμε τα υγρά μπορούμε να συνδέσουμε τον διακόπτη στην φύσα του και να τον βάλουμε πάλι σε μπρίκι με θερμόμετρο και να θερμάνουμε το νερό. Όταν το νερό φτάσει στους 92 βαθμούς Κελσίου θα πρέπει να ξεκινήσει το βεντιλατέρ. Ο διακόπτης στο κλειδί πρέπει να είναι στο ΟΝ!!! Το βεντιλατέρ πρέπει να κλείσει όταν το νερό πέσει στους 87 βαθμούς (αντί να περιμένετε μπορείτε να ρίξετε λίγο κρύο νερό στο μπρίκι). Στην εικόνα 2 φαίνεται το 92/87 που ανοίγει και κλείνει ο διακόπτης.
Αφού βιδώσουμε την βίδα από όπου βγάλαμε τα παλιά υγρά, βιδώνουμε και τον διακόπτη. Το κύκλωμα πλέον έχει κλείσει. Βάζουμε υγρά στο κύκλωμα. Στο πάνω δοχείο έχει τους δείκτες MIN – MAX. Πληρώνουμε μέχρι το ΜΑΧ. Το κύκλωμά μας έχει ακόμα αέρα μέσα. Υπόψη ότι δεν πρέπει να κλείσουμε την τάπα πλήρωσης και γενικά την μηχανή γιατί θα χρειαστεί να συμπληρώσουμε (έστω και λίγο). Ανάβουμε την μηχανή και ενώ τραβάμε λίγο το γκάζι ώστε να ανεβάσουμε στροφές, ανοίγουμε λίγο την βίδα από όπου αδειάσαμε το σύστημα. Ή θα ακουστεί ήχος εκτόνωσης (όπως όταν κάνουμε εξαέρωση στα σώματα των καλοριφέρ στο σπίτι μας) ή θα αρχίσει να τρέχει μόνο υγρό.
Συμπληρώνουμε ξανά στο ΜΑΧ τα υγρά και κλείνουμε την μηχανή. Αυτό ήταν. Θα ακολουθήσουνε περισσότερες φωτογραφίες σε λίγες μέρες.
Υ.Γ. Αφού αδειάσουμε τα παλιά υγρά μπορούμε να πλύνουμε το ψυγείο με νερό ώστε να καθαρίσει από τυχών υπολείμματα. Όταν δείτε να βγαίνει το νερό καθαρό και από την κάτω μεριά τότε το ψυγείο έχει καθαρίσει.
My problem was that the fan of the radiator of my DUCATI 748 did not turn on.
This led to crack the top container of the radiator (Figure 1 item 1 with code 585.1.011.1A and cost 36 €).
To find where the problem is I started the inspection from the fan . I powered it with 12V. and I saw that it was works. The circuit is simple.
I took out the wiring from the thermostatic switch and jumpered the two terminals. Again the fan came on. At this point we may connect a switch to this wiring and make the fan able to turn on manually.
The next step was to check the thermostatic switch (Figure 1 item 20 code 552.4.008.1A). In order to take out the switch you should empty the cooling liquid first. This is easily done if you unscrew the cap – screw that is next to the switch for this very purpose (figure 1 item 22). It is advisable to open the filler cap on the upper water tank to drain more easily the radiator system (Figure 1 item 2 ).
To test the thermal switch out of the circuit, I fastened it with a wire inside a pot of water. The switch should lie into the water below the metal surface. Connect a multimeter to the two terminals of the switch and start warming up. The multimeter should be set to identify closed circuits. It is advisable to monitor the water temperature with a cooking thermometer. Beware, the thermometer should not touch on the base of the pot because the temperature there is different (higher)!!!
From the above experiment I have concluded that the switch was faulty. Go for a spare. A phonecall to DUCATI, the cost of the switch was around 60 € !!! Search at ebay, the used thermoswithes were around 30 € ( without p&p) .
Fortunately, there are friends who know better than me and also want to help in any way.
So, my friend Costas found the following brand new thermostatic switch (figures 2-5) at the price of 3 € with reciept. I spell it words to be no issue. At the price of three Euros including VAT!!! In the pictures above you will see all descriptions of the switch so that you can search to find it by yourself.
Let’s reassemble it now and test the circuit with our new component. Before filling liquids you may connect the switch to the motorcycle’s wiring and put it back into the pot with a thermometer heating water. When the water reaches 92 degrees Celsius the fan should start working. The engine switch (key switch) must be ON !!! The ventilator should turn off when the water drops to 87 degrees (instead of waiting, you may put some cold water in the coffee pot). Figure 2 shows the 92/87 degrees of Celsius that the switch turns on and off.
After screwing the screw from where we took the old fluids out, we screw back the switch too. The circuit is now closed. Pour the liquid inside the circuit (select a quality liquid and not the common from the local car store with 105 degrees of max temperature). The top container is indicated with MIN – MAX. We fill up to MAX. Our circuit still has air inside. Whereas we should not close the filler cap and in general the motorcycle because you may need to fill it more (even slightly). Turn on the engine and pull a bit the throttle while unscrewing the little screw where emptying from the circuit. You will hear an expansion sound (as when we bleed on the heating radiators in our house) or it will start draining only cooling liquid.
Refill the liquid to MAX and assemble the motorcycle. That’s it. More photos will follow in a few days.
P.S. After emptying the old cooling fluid you may wash the radiator with water to clean out oddments. When you see the water coming out clean on the other side you will know you have done your job properly.
Best regards
Pavlos