PHP7 and APACHE 2.4 Upgrade

A (very) sort guide.

PHP7 upgrade

  1. Download PHP for windows – use the “windows download” link on the official PHP downloads page. (https://www.php.net/downloads.php)
  2. Select version to download.
    We will download the version for APACHE server. It comments that for APACHE web server you need to download the ThreadSafe (TS) version of PHP.
  3. Select which TS version you like to download.
    These are the x32 and x64.
  4. Select which VC version you like to download.
    VC15 or VC16 ? (Visual Studio 2017 or 2019 compiler respectively)
    – The VC15 and VS16 builds require to have the Visual C++ Redistributable for Visual Studio 2015-2019 x64 or x86 installed.
  5. Rename the folder of the existing php installation (e.g. from PHP7 to PHP7_old). Keep this folder until the new installation works properly.
  6. Extract the downloaded zip file and rename the folder to the existing php folderinstallation. (e.g. PHP7).
  7. Use the compare plugin of notepad++ to compare the old and the new php.ini files. Make the appropriate changes on the new ini file. Do not forget to create all needed folders.
  8. Delete the PHP7_old folder if everything works properly.

APACHE2.4 upgrade

  1. Download APACHE for windows – use the “files for windows” link on the official APACHE downloads page. (https://httpd.apache.org/download.cgi )
  2. Use the Apache Lounge link.
  3. Download the appropriate zip file for your system e.g. Apache 2.4.xx Win64.
  4. You should have VC16 already installed. If not, there are links on this page above the binaries. It comments “Be sure you installed latest…”.
  5. Rename the folder of the existing apache installation (e.g. from APACHE24 to APACHE24_old). Keep this folder until the new installation works properly.
  6. Extract the zip file and rename the folder e.g. APACHE24.
  7. Use the compare plugin of notepad++ to compare the old and the new httpd.conf files. Make the appropriate changes on the new conf file. Do not forget to create all needed folders.
  8. Delete the APACHE24_old folder if everything works properly.

Best regards
Pavlos

Create SSL Certificate for website in Apache 2.4 and Windows Server

You should follow the steps below to create an ssl certificate of Apache2.4 in Windows Server environment.

Creating the OpenSSL command
The easiest way is to use the website of digicert to get the openssl command that generates the CSR file.

Digicert OpenSSL CSR Wizard: https://www.digicert.com/easy-csr/openssl.htm

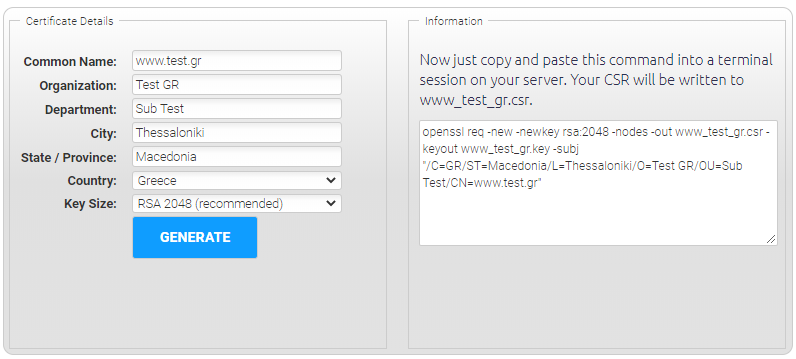
An example of the wizard can be seen below.

Digicert OpenSSL CSR Wizard

The command text of the example is the following.
openssl req -new -newkey rsa:2048 -nodes -out www_test_gr.csr -keyout www_test_gr.key -subj “/C=GR/ST=Macedonia/L=Thessaloniki/O=Test GR/OU=Sub Test/CN=www.test.gr”
You may modify the above command to get the OpenSSL command without the use of the wizard.

Get the CSR and KEY files
Open a command line and navigate to the bin folder of the Apache installation. It is where the openssl.exe file resides.

You should copy the above command (“openssl”) and paste it into the command line window. You should get two files, the CSR and the KEY files.

Get the Certificate
Use the CSR content to create the CER or CRT file from your Certificate provider.

Add the Certificate into the httpd.conf file of Apache
Open the httpd.conf file and add the following virtualhost

VirtualHost SSL

ServerName www.test.gr
ServerAlias test.gr
SSLEngine on
SSLCertificateFile “C:/Apache24/FolderOfSSLfile/test_gr_cert.cer”
SSLCertificateKeyFile “C:/Apache24/FolderOfSSLfile/test_gr.key”
SSLCertificateChainFile “C:/Apache24/FolderOfSSLfile/test_gr.csr”

Do not forget to redirect the insecure site to the secure one.

VirtualHost – Redirection

ServerName www.test.gr
ServerAlias test.gr *.test.gr
Redirect “/” “https://www.test.gr/”

(the virtual host redirection should be above the virstual host SSL)

Best regards
Pavlos

Joomla 3.x – copy failed: – .htaccess problem – SOLVED

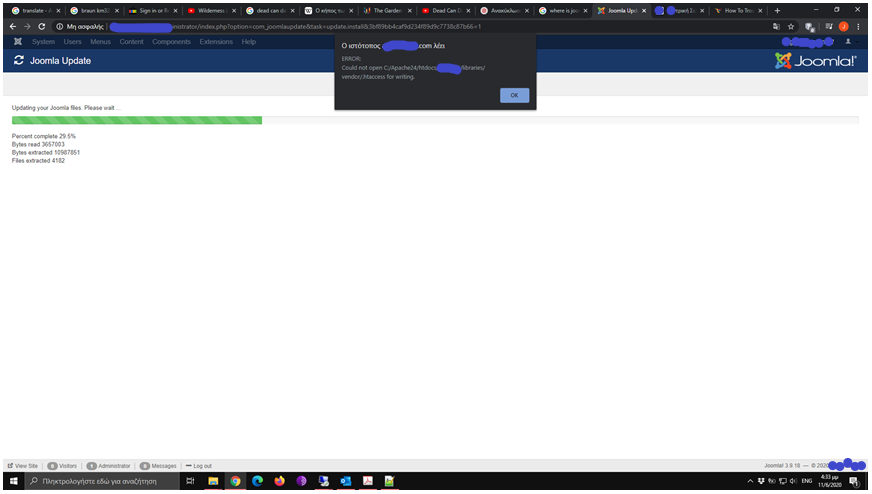
Error: Could not open c:/xyz/xyz/.htaccess for writing

After several years of Joomla use I have received the following error on my website.
————————————————————————————

Warning

Copy failed: C:\Apache24\htdocs\website\tmp\install_5ecbb9cc419bf\install_5ecbb9cc55a50\fof\.htaccess to C:\Apache24\htdocs\website\libraries\fof30\.htaccess

JInstaller: :Install: Failed to copy file C:\Apache24\htdocs\website\tmp\install_5ecbb9cc419bf\install_5ecbb9cc55a50\fof\.htaccess to C:\Apache24\htdocs\website\libraries\fof30\.htaccess

Copy file failed

Package Update: There was an error installing an extension: com_akeeba-pro.zip

Before updating ensure that the update is compatible with your Joomla! installation.
You are strongly advised to make a backup of your installation before you start updating.

————————————————————————————

Browser error while trying to update Joomla.
Browser view of Joomla update freeze on 23%.

I have faced the above problem when I tried to automaticaly update any of my iinstalled plugins and even when I tried to upgrade Joomla to a newer version. The only plugin which was able to update without problem was the language package!
I have searched the web for help but unfortunately I could not end up to a proper solution. Actually, I could not find someone with the same problem.
I have tried to realize if my problem caused by folder permissions error (.htaccess) but it did not – Step 5 (below) ensures it was not a permissions problem.

SOLUTION

  1. Backup your site.
  2. Update manually your website to the latest Joomla version.
    https://www.youtube.com/watch?v=Duba0GEj2L8
    (Joomla 3.x. How To Update The Engine Manually)
    Do not forget to fix the database structure
    Extensions – Manage – Database – Fix.
  3. Check that Joomla has been updated successfully and that your site works properly.
  4. Check if the error persists – try to automatically update your plugins.
    Extensions – Manage – Update.
    If they update, then fine – time to stop reading.
    If they not, then continue reading.
  5. Ensure that you are able to install a new instance of Joomla (latest verion – same with your update website) on your server without any problem. Do it, make the installation and delete the installation folder.
    Check the front end that works properly.
  6. Copy the following folders from the root of the fresh installation to your website.
    – administrator
    – components
    – includes
    – libraries
    – modules
    – plugins
  7. (Repeat Step 4) Check if the error persists – try to automatically update your plugins.
    You should be able to automatically (not manually) update your plugins.
  8. Check that your website’s front and back ends work properly.
  9. Backup your corrected website.

Best regards
Pavlos

Create Joomla 3.x Collapse Menu with Bootstrap 3.0 Navbar on your Template – example

The idea is the development of a new layout of Joomla’s com_menu which will be responsive.

This tutorial requires the knowledge of:

  • Joomla 3.x template development,
  • Bootstrap installation on Joomla template.

So, as long as you have your Joomla template (TemplateName) ready with Bootstrap support, use the steps below:

  1. Create you Menu on the Menu Manager of Joomla (backend).
  2. Copy the file default.php from the folder
    joomla_installation_folder/modules/mod_menu/tmpl
    and paste it inside your template in the folder. You need to rename the file to something more familiar like MyMenu.php
    joomla_installation_folder/templates/TemplateName/html
  3. Update the code of the php file to adapt Bootstrap Responsive Menu Navbar.
    a) Replace the existing line of code:

    <ul class=”nav menu<?php echo $class_sfx; ?> mod-list”<?php echo $id; ?>>

    with these lines of code:

    <nav class=”navbar navbar-expand-xl navbar-light pl-0″><button class=”navbar-toggler” type=”button” data-toggle=”collapse” data-target=”#navbarSupportedContent” aria-controls=”navbarSupportedContent” aria-expanded=”false” aria-label=”Toggle navigation”><i class=”fas fa-bars”></i></button><div class=”collapse navbar-collapse” id=”navbarSupportedContent”><ul class=”navbar-nav hitMenuBold<?php echo $class_sfx; ?>”<?php echo $id; ?>>

    b) Replace the following line of code inside the foreach loop:

    $class = ‘item-‘ . $item->id;

    with these line of code:

    $class = ‘nav-item ml-2 item-‘ . $item->id;

    c) Close the HTML tags properly at the end of the file.
    Replace the closing tags:

    ?></ul>

    with these:

    ?></ul></div></nav>

    You may download the updated MyMenu.php file here (for security reasons it has been renamed to TXT file). Do not use it directly since it may be from an older joomla version. Just have a look of the changes in the actual file. 

4. Go to the Extensions -> Modules -> YourMenu of Joomla (backend).

On the Advanced tab, go to the Layout drop down menu and select the MyMenu layout that you have created above. It should be under your template name
(–From TemplateName Template–). Press the “Save” button.
Check your menu on the frontend. It should be responsive by now.

Best regards
Pavlos

Εκδρομή στην Ρώμη – χρήσιμες πληροφορίες

Οδηγός για Ρώμη.
1)    Διαμονή
Εμείς μείναμε στο Mikale Rooms. Το βρήκαμε από το booking.
Πεντακάθαρα, ανακαινισμένα δωμάτια σε έναν χώρο που μάλλον παλιότερα ήταν ένα διαμέρισμα. Αυτόν τον χώρο ο τύπος τον διαρρύθμισε σε 4 δωμάτια. Έχει ένα τυπικό πρωινό με (κατεργασμένα προϊόντα) κέικ, φρυγανιές, μαρμελάδες, δημητριακά, γάλα, τσάι κτλ. Μπορεί επίσης να σου φτιάξει και τοστ αν το ζητήσεις χωρίς επιπλέον κόστος.
Όπως είπα τα δωμάτια ήταν μόλις και πλήρως ανακαινισμένα με υπέροχο μπάνιο με ντουζιέρα.
Η τιμή του είναι πολύ καλή για την ποιότητα που προσφέρει.
Ο ιδιοκτήτης είναι πολύ φιλικός και εξυπηρετικός ενώ μιλάει πολύ καλά αγγλικά.

2)    Εισιτήρια – μετακινήσεις
Αν σκοπεύετε να περπατήσετε την Ρώμη τότε δεν χρειάζεστε εισιτήρια πολλαπλών διαδρομών και ημερών. Η Ρώμη πραγματικά πρέπει να περπατηθεί για να την δεις ολόκληρη. Κάθε γωνία κάτι έχει να σου δείξει, έστω και για μία μόνο φορά που θα την περιηγηθείς. Το ημερήσιο εισιτήριο κοστίζει 7€ ενώ το απλό εισιτήριο 1,5€. Δλδ, θέλεις πάνω από 5 διαδρομές για να συμφέρει το πολλαπλών διαδρομών.

3)    Αξιοθέατα
Βατικανό
Το εισιτήριο του Βατικανό κοστίζει 16€ (Δεκέμβριος 2015). Το εισιτήριο περιλαμβάνει όλους τους χώρους του Βατικανού χωρίς τους κήπους (τους βλέπεις από πάνω από το αίθριο – κατά την άποψή μου από πάνω είναι καλύτερη η θέα). Τους κήπους τους επισκέπτονται όσοι (μάλλον) έχουν κλείσει ομαδική ξενάγηση.
Η επίσκεψή σας θα πρέπει να ξεκινήσει στις 9:00 το πρωί. Και αυτό γιατί αφενός εκείνη την ώρα δεν θα βρείτε πολύ κίνηση στην είσοδο και αφετέρου θα έχετε όσο ώρα θέλετε να ξοδέψετε στην επίσκεψη. Εμάς μας πήρε 6 ώρες ευχάριστης περιήγησης. Προσωπικά θα μπορούσα να κάτσω και άλλη μια ώρα αλλά η υπόλοιποι δεν ακολουθούσαν τον (αργό) ρυθμό μου.
Πριν την είσοδό σας στο Βατικανό και στην αρχή των κιγκλιδωμάτων θα σας πλευρίσουν διάφοροι που θα σας πουν ότι δουλεύουν για το Βατικανό και θα σας εξηγήσουν τί συμβαίνει με τα εισιτήρια. ΦΥΓΕΤΕ ΚΑΙ ΜΗΝ ΤΟΥΣ ΑΚΟΥΣΕΤΕ!!! Δουλεύουν για κάποια πρακτορεία που κλείνουν ακριβότερα εισιτήρια (εμάς μας ζητούσαν 55€ το άτομο) με την παροχή του fast lane για να μην περιμένεις στην ουρά (ποιά ουρά στις 9:00 το πρωί;;; ) αλλά και για επίσκεψη στους κήπους. Ψευδώς επίσης μας τόνιζε ότι με το κανονικό εισιτήριο (των 16€) που κόψαμε από μέσα θα βλέπαμε μόνο μια πτέρυγα του μουσείου.
Επίσης πρέπει να τονίσουμε ότι πρώτα ελέγχεσαι από μηχανήματα (τύπου αεροδρομίου) και μετά κόβεις εισιτήριο. Αυτό το αναφέρω γιατί και την fast lane να χρησιμοποιήσεις, αν έχει κόσμο στην ουρά, πάλι θα περιμένεις να σε ελέγξουν στα μηχανήματα. Δεν υπάρχει μηχάνημα που να ελέγχει μόνο αυτούς από την fast lane.
Πολύ καλό είναι επίσης να νοικιάσετε την συσκευή περιγραφής των εκθεμάτων. Η κάθε συσκευή κοστίζει 7€ και αν θέλεις μπορείς είτε να βάλεις τα δικά σου ακουστικά (απαραίτητο για να έχεις ελεύθερα τα χέρια σου για φωτογραφίες ενώ ταυτόχρονα ακούς) είτε να αγοράσεις ένα σετ ακουστικά από τον γκισέ (1,5€).
Η καλύτερη επιλογή είναι να νοικιάσεις μία συσκευή και να μοιραστείς το ακουστικό σου με τον άνθρωπό σου! Νομίζω ότι είδα δύο εισόδους ακουστικών για 2 σετ ακουστικά αλλά δεν είμαι και σίγουρος. Τα πιο σπουδαία εκθέματα έχουν ένα κόκκινο σύμβολο με ένα ακουστικό και έναν αριθμό. Πληκτρολογείς τον αριθμό στην συσκευή και ακούς την περιγραφή. ΑΞΙΖΕΙ ΤΟΝ ΚΟΠΟ! Πρέπει να έχει πάνω από 300 περιγραφές και για τα σημαντικότερα (π.χ. Capela Sixtina) δεν είναι σύντομες. Ελληνική γλώσσα σε συσκευή δεν υπάρχει.
Ο καφές στο καφέ του εξωτερικού χώρου ήταν περιέργως σε αρκετά καλή τιμή (3,5€ ο καπουτσίνο) αν σκεφτείς ότι είσαι μέσα στο Βατικανό.

Κολοσσαίο
Κόστος εισιτηρίου 12€ και η συσκευή περιήγησης άλλα 6€. Από το να αγοράσετε τόσες συσκευές όσες είστε εσείς μπορείτε να κάνετε το εξής. Ανά 2 άτομα να νοικιάσετε μία. Εμείς ήμασταν 4 άτομα και πήραμε μόνο μία. Ο ένας άκουγε και τα μετέφραζε στους υπόλοιπους. Προφανώς και εδώ ελληνικά δεν υπάρχουν.

Μουσείο Σαν Άντζελο
Πήγαμε την Κυριακή 6/12 και για κάποιον λόγο ήταν ελεύθερη η είσοδος.

4)    Εστιατόρια – Καφέ
Il Colibri
Via Famagosta, 69-71,00192 Roma RM
+39 06 3751 4767
Ωράριο:  10:30 π.μ. – 4:00 μ.μ.,7:00 μ.μ. – 1:00 π.μ.
Καλό εστιατόριο και ποιοτικό. Η τιμή εξαρτάται από το τι θα παραγγείλεις. Δλδ μπορείς να την βγάλεις φθηνά (περίπου 10€ το άτομο) αν πάρεις μόνο μια πίτσα. Από εκεί και μετά έχει πολύ ωραία ζυμαρικά δικά τους (παπαρδέλες και ραβιόλι της ημέρας ήταν πολύ ωραία ενώ την επόμενη οι ταλιατέλες όχι τόσο), μπριζόλα Τ-bone για 2 άτομα στα 30€ που ήταν πολύ νόστιμη και μέτρια (όπως πρέπει) ψημένη. Προσοχή, το μέτρια (medium) ψημένη είναι με κόκκινο κρέας στην μέση! Η σαλάτα τους δεν αξίζει τα λεφτά της γιατί είναι πολύ μικρή.

Jetlag 64 Café
Via Leone IV 64, Roma
Πολύ ωραίο μαγαζί για πίτσα μπύρα σε πολύ καλή ποιότητα και καλή τιμή. Το ίδιο και οι καφέδες τους. Επίσης έχει happy hour μετά τις 18:30. Οι υπάλληλοι πολύ φιλικοί επίσης.

Enofficina
Φθηνό καφέ (εσπρέσο 1€, καπουτσίνο 2€, κτλ) δίπλα στο Mikale Rooms είναι ακριβώς απέναντι στην γωνία με via trionfale και λέγεται Enofficina.
Για πολύ καλό και φθηνό (φρεσκοψημένα κρουασάν σοκολάτας με 0,3€ – σάντουιτς με προσούτο στα 2-2,5€) πρωινό θα πάτε σε έναν φούρνο που είναι σε υπόγειο (κατεβαίνεις σκάλες) στην via Barleta στην έξοδο του Μετρο στάση Ottaviano (στα 300 μέτρα) από την πλευρά που είναι το μαγαζί lemongrass.

Να θυμάστε ότι τον καφέ (έστω και εσπρέσο) μπορείς να τον πάρεις 1€ στα συνοικιακά μαγαζιά μακριά από τα αξιοθέατα ενώ στα τουριστικά μαγαζιά θα τους πάρεις μέχρι και 6€. Με λίγο ψάξιμο και σε κανένα στενοσόκακο πάντα θα βρεις ένα καλό και φθηνό καφέ!
Moodle REST Web Services tutorial – example – instructions – guidelines

You may download my php example here.

Here you will find instructions to create Web Services on Moodle.
I am not a Moodle expert. I have collected these information from many different sources and I have eliminated their errors to give you an easy to follow tutorial together with a working example.
This tutorial creates a web service, enabled to create a new user and to enroll this user to a course.

Please follow the steps below:

1) Create the user which will serve the web services.
Go to:
Site Administrator > Users > Accounts > Add new user
Username: wsuser (user your own)
Password: (user your own)
Fill in the required fields.

2) Give the wsuser the appropriate role.
Go to:
Site Administrator > Users > Permissions > Define roles
Press the Add new role button.
Select Role archetype = ARCHETYPE: Manager and press continue.
On the form:
Web Service User
Context types where this role may be assigned: System/User/Category/Course
Leave the rest selections as they appear.
Capabilities
Add the following capabilities:
webservice/rest:use
moodle/user:create
enrol/manual:enrol
enrol/category:synchronised
enrol/manual:unenrolself
Press Create this role button.

3) Assign System roles.
Go to:
Site Administrator > Users > Permissions > Assign System Roles
Assign wsuser user.

4) Create the needed services.
Go to:
Site Administrator > Plugins > Web Services > External Services
We need the two services below:

a) Create user – service
On custom services table press add.
Name: create_user
Short: create_user
“Enabled” should be checked.
“Authorized users only” should be checked.
Press “show more”.
Search for capability moodle/user:create and select it.
Press “add service”.
This service has no functions.
Add functions.
Search for the core_user_create_user
Select it and press add function.

b) Enroll user – service
On custom services table press “add”.
Name: enrol_user
Short: enrol_user
“Enabled” should be checked.
“Authorized users only” should be checked.
Press “show more”.
Search for capability enroll/manual:enrol and select it.
Press “add service”.
This service has no functions.
Add functions.
Search for the enrol_manual_enrol_users
Select it and press “add function”.
On the list of custom services you have to add the authorized user to be the wsuser.

5) Create the Tokens.
Go to:
Site Administrator > Plugins > Web Services > External Services > Manage Tokens
Add
a) Create User
Select user Web Service User
Service – create user
Save changes.

b) Enroll User
Select user Web Service User
Service – enrol user
Save changes.

You now have the two required tokens.

6) All web service protocols are disabled. The «Enable web services» setting can be found in Advanced features.
Go to:
• Site Administrator > Advanced features > Enable web services checked – Save.
• Site Administrator > Plugins > Web Services > External Services > Manage Protocols.
Activate REST protocol.
Check the documentation box.

7) CURL.php is required on the client side. You may download it here.
8) Check if create user works using php code.
9) Check if enroll user works using php code.
10) The wsuser user can not assign role without being enrolled in the course/s!!!

Best regards
Pavlos

DUCATI 748 radiator fan problem – πρόβλημα ανεμιστήρα βεντιλατερ στο ψυγείο νερού

Jump to the English version here.

Το πρόβλημά μου ήταν ότι ο ανεμιστήρας του ψυγείου του DUCATI 748 δεν άνοιγε.
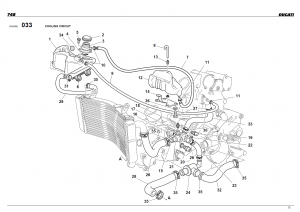
Αυτό είχε ως αποτέλεσμα να ραγίσει το πάνω δοχείο του ψυγείου (εικόνα 1 αντικείμενο 1 με κωδικό 585.1.011.1A και κόστος 36€).
Εδώ πρέπει να πω ότι επειδή δεν άνοιξα τα μάτια μου καλά, αγόρασα πρώτα το κάτω δοχείο (εικόνα 1 αντικείμενο 12 με κωδικό 585.1.012.2A και κόστος 72€) το οποίο και έχω ακόμα – αχρείαστο να είναι. Όποιος δεν έχει μυαλό…
cooling cirquit ducati 748
Εικόνα 1 Figure.
Για να βρω τί φταίει στο σύστημα ξεκίνησα από τον ανεμιστήρα. Του έδωσα 12V. και είδα ότι λειτουργεί. Το κύκλωμα είναι απλό.
Έβγαλα την φύσα από τον θερμοστατικό διακόπτη και βραχυκύκλωσα τους δύο ακροδέκτες. Και πάλι ο ανεμιστήρας άναψε. Σε αυτό το σημείο μπορούμε να συνδέσουμε έναν διακόπτη στην φύσα και να κάνουμε τον ανεμιστήρα να ανοίγει χειροκίνητα.
Το επόμενο βήμα ήταν να ελεγχθεί ο θερμοστατικός διακόπτης (εικόνα 1 αντικείμενο 20 κωδικός 552.4.008.1A). Για να βγει όμως ο διακόπτης πρέπει να αδειάσουμε τα υγρά του ψυγείου. Αυτό γίνεται εύκολα αν ξεβιδώσουμε την τάπα-βίδα που υπάρχει δίπλα τον διακόπτη γι′ αυτόν ακριβώς τον σκοπό (εικόνα 1 αντικείμενο 22). Καλό θα είναι να ανοίξουμε την πάνω τάπα πλήρωσης του δοχείου νερού ώστε να αδειάσει πιο εύκολα το σύστημα ψύξης (εικόνα 1 αντικείμενο 2).
Σε ένα μπρίκι με νερό στερεώνουμε τον διακόπτη με σύρμα ώστε να βρίσκεται μέσα στο νερό η κάτω μεταλλική του επιφάνεια. Συνδέουμε ένα πολύμετρο στους δύο ακροδέκτες του διακόπτη και ξεκινάμε το ζέσταμα. Το πολύμετρο πρέπει να ρυθμιστεί στον να δείχνει πότε ένα κύκλωμα ειναι κλειστό (ηχητικό σήμα). Καλό είναι να παρακολουθούμε την θερμοκρασία του νερού με ένα μαγειρικό θερμόμετρο. Προσοχή το θερμόμετρο να μην ακουμπάει στο στην βάση από το μπρίκι γιατί εκεί η θερμοκρασία είναι διαφορετική!!!
Από το παραπάνω πείραμα κατέληξα ότι ο διακόπτης είχε πρόβλημα. Πάμε για αλλαγή. Τηλέφωνο στην DUCATI και κόστος γύρω στα 60€!!! Αναζήτηση στο ebay, όλοι μεταχειρισμένοι γύρω στα 30€ (χωρίς μεταφορικά).
Ευτυχώς όμως που υπάρχουν και οι φίλοι που γνωρίζουν καλύτερα από μένα και επίσης θέλουν να βοηθήσουν με οποιοδήποτε τρόπο.
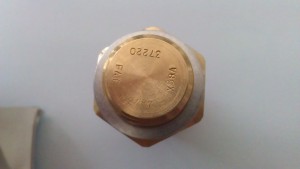
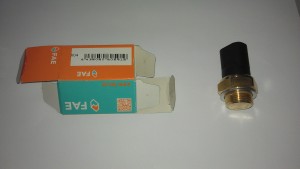
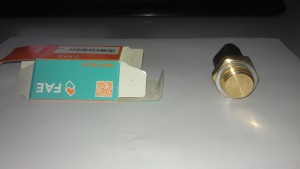
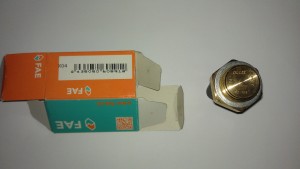
Έτσι ο φίλος Κώστας μου βρήκε τον παρακάτω θερμοστατικό διακόπτη ολοκαίνουριο (εικόνες 2-5) στην τιμή των 3€ με απόδειξη. Το γράφω και ολογράφως για να μην υπάρχει θέμα. Στην τιμή των τριών Ευρώ με ΦΠΑ!!! Στις παρακάτω εικόνες θα δείτε όλα τα στοιχεία του διακόπτη ώστε να μπορέσετε να τον ψάξετε και μόνοι σας.
thermostatic switch image
Εικόνα 2 Figure.

thermostatic switch image
Εικόνα 3 Figure.
thermostatic switch image
Εικόνα 4 Figure.
thermostatic switch image
Εικόνα 5 Figure.
Πάμε τώρα για την τοποθέτηση και τον έλεγχο του κυκλώματος με το νέο εξάρτημα.
Πριν συμπληρώσουμε τα υγρά μπορούμε να συνδέσουμε τον διακόπτη στην φύσα του και να τον βάλουμε πάλι σε μπρίκι με θερμόμετρο και να θερμάνουμε το νερό. Όταν το νερό φτάσει στους 92 βαθμούς Κελσίου θα πρέπει να ξεκινήσει το βεντιλατέρ. Ο διακόπτης στο κλειδί πρέπει να είναι στο ΟΝ!!! Το βεντιλατέρ πρέπει να κλείσει όταν το νερό πέσει στους 87 βαθμούς (αντί να περιμένετε μπορείτε να ρίξετε λίγο κρύο νερό στο μπρίκι). Στην εικόνα 2 φαίνεται το 92/87 που ανοίγει και κλείνει ο διακόπτης.
Αφού βιδώσουμε την βίδα από όπου βγάλαμε τα παλιά υγρά, βιδώνουμε και τον διακόπτη. Το κύκλωμα πλέον έχει κλείσει. Βάζουμε υγρά στο κύκλωμα. Στο πάνω δοχείο έχει τους δείκτες MIN – MAX. Πληρώνουμε μέχρι το ΜΑΧ. Το κύκλωμά μας έχει ακόμα αέρα μέσα. Υπόψη ότι δεν πρέπει να κλείσουμε την τάπα πλήρωσης και γενικά την μηχανή γιατί θα χρειαστεί να συμπληρώσουμε (έστω και λίγο). Ανάβουμε την μηχανή και ενώ τραβάμε λίγο το γκάζι ώστε να ανεβάσουμε στροφές, ανοίγουμε λίγο την βίδα από όπου αδειάσαμε το σύστημα. Ή θα ακουστεί ήχος εκτόνωσης (όπως όταν κάνουμε εξαέρωση στα σώματα των καλοριφέρ στο σπίτι μας) ή θα αρχίσει να τρέχει μόνο υγρό.
Συμπληρώνουμε ξανά στο ΜΑΧ τα υγρά και κλείνουμε την μηχανή. Αυτό ήταν. Θα ακολουθήσουνε περισσότερες φωτογραφίες σε λίγες μέρες.
Υ.Γ. Αφού αδειάσουμε τα παλιά υγρά μπορούμε να πλύνουμε το ψυγείο με νερό ώστε να καθαρίσει από τυχών υπολείμματα. Όταν δείτε να βγαίνει το νερό καθαρό και από την κάτω μεριά τότε το ψυγείο έχει καθαρίσει.

———————————————-

My problem was that the fan of the radiator of my DUCATI 748 did not turn on.
This led to crack the top container of the radiator (Figure 1 item 1 with code 585.1.011.1A and cost 36 €).
To find where the problem is I started the inspection from the fan . I powered it with 12V. and I saw that it was works. The circuit is simple.
I took out the wiring from the thermostatic switch and jumpered the two terminals. Again the fan came on. At this point we may connect a switch to this wiring and make the fan able to turn on manually.
The next step was to check the thermostatic switch (Figure 1 item 20 code 552.4.008.1A). In order to take out the switch you should empty the cooling liquid first. This is easily done if you unscrew the cap – screw that is next to the switch for this very purpose (figure 1 item 22). It is advisable to open the filler cap on the upper water tank to drain more easily the radiator system (Figure 1 item 2 ).
To test the thermal switch out of the circuit, I fastened it with a wire inside a pot of water. The switch should lie into the water below the metal surface. Connect a multimeter to the two terminals of the switch and start warming up. The multimeter should be set to identify closed circuits. It is advisable to monitor the water temperature with a cooking thermometer. Beware, the thermometer should not touch on the base of the pot because the temperature there is different (higher)!!!
From the above experiment I have concluded that the switch was faulty. Go for a spare. A phonecall to DUCATI, the cost of the switch was around 60 € !!! Search at ebay, the used thermoswithes were around 30 € ( without p&p) .
Fortunately, there are friends who know better than me and also want to help in any way.
So, my friend Costas found the following brand new thermostatic switch (figures 2-5) at the price of 3 € with reciept. I spell it words to be no issue. At the price of three Euros including VAT!!! In the pictures above you will see all descriptions of the switch so that you can search to find it by yourself.
Let’s reassemble it now and test the circuit with our new component. Before filling liquids you may connect the switch to the motorcycle’s wiring and put it back into the pot with a thermometer heating water. When the water reaches 92 degrees Celsius the fan should start working. The engine switch (key switch) must be ON !!! The ventilator should turn off when the water drops to 87 degrees (instead of waiting, you may put some cold water in the coffee pot). Figure 2 shows the 92/87 degrees of Celsius that the switch turns on and off.
After screwing the screw from where we took the old fluids out, we screw back the switch too. The circuit is now closed. Pour the liquid inside the circuit (select a quality liquid and not the common from the local car store with 105 degrees of max temperature). The top container is indicated with MIN – MAX. We fill up to MAX. Our circuit still has air inside. Whereas we should not close the filler cap and in general the motorcycle because you may need to fill it more (even slightly). Turn on the engine and pull a bit the throttle while unscrewing the little screw where emptying from the circuit. You will hear an expansion sound (as when we bleed on the heating radiators in our house) or it will start draining only cooling liquid.
Refill the liquid to MAX and assemble the motorcycle. That’s it. More photos will follow in a few days.
P.S. After emptying the old cooling fluid you may wash the radiator with water to clean out oddments. When you see the water coming out clean on the other side you will know you have done your job properly.

Best regards
Pavlos